Suggested testing battery using the TRX Suspension Trainer®
This is an excerpt from Complete Guide to TRX® Suspension Training®-2nd Edition by Jay Dawes.
While any of the exercises in this book can be used as a formal or formative assessment for improvements in fitness and performance, the following test battery using the Suspension Trainer provides a balanced assessment of trunk, upper-body, and lower-body endurance.
TRX Forearm Plank
Adjust the straps to mid-calf length. Lie on the ground facing away from the anchor point. Place one foot in each foot cradle. From the facedown position, lift the hips and torso until the elbows are directly under the shoulders and the upper arms are perpendicular to the ground using one continuous movement (see figure). Measure this test by tracking the time spent holding the plank position with perfect form and technique. As soon as technique breaks, the test should be terminated. This should be the first test performed in the series. If unable to perform this exercise, substitute the standing plank (see page 135).

TRX Push-Up
Adjust the straps to mid-calf length. Lie on the ground facing away from the anchor point and place the feet in the foot cradles. Place the hands on the ground approximately shoulder-width apart. Set the body in a straight line, or plank position. While bracing the trunk and keeping the arms straight, pull the shoulder blades down and together (see figure a). Flex the elbows to lower the body to the ground, keeping the torso flat and rigid, until reaching a 90-degree angle at the elbows (see figure b). Push the body back up to the starting position. This test is measured by counting the number of repetitions performed within a set period of time (e.g., one or two minutes), or by counting the number of repetitions performed with good technique or until volitional fatigue. During the test, one may rest in the starting position. If the individual is unable to maintain a proper plank position (i.e., hips drop or rise), the test should be terminated and the number of repetitions to this point should be recorded.

TRX Low Row
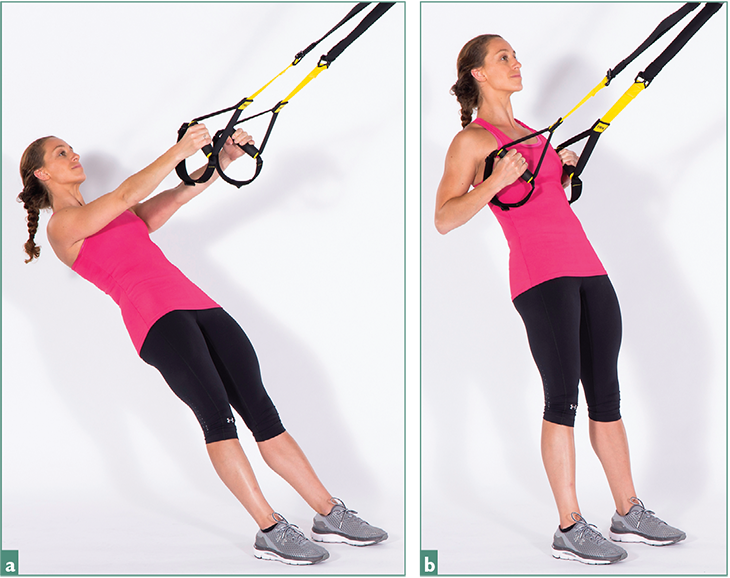
Fully shorten the straps. Stand facing the anchor point and grab the handles (one in each hand) using a neutral grip. While keeping the arms completely straight, position your feet directly underneath the anchor point and lean back until the torso is at approximately a 45-degree angle to the ground (see figure a). Pull the shoulder blades together and downward. Pull the body toward the anchor point by flexing the arms and extending the shoulders (see figure b). Slowly extend the arms and allow the shoulders to flex to return to the starting position. This test is measured by counting the number of repetitions performed within a set period of time (e.g., one or two minutes), or by counting the number of repetitions performed with good technique or until volitional fatigue. During the test, one may rest in the starting position. If the individual is unable to maintain a proper plank position (i.e., hips drop or rise), the test should be terminated and the number of repetitions to this point should be recorded.

TRX Lunge
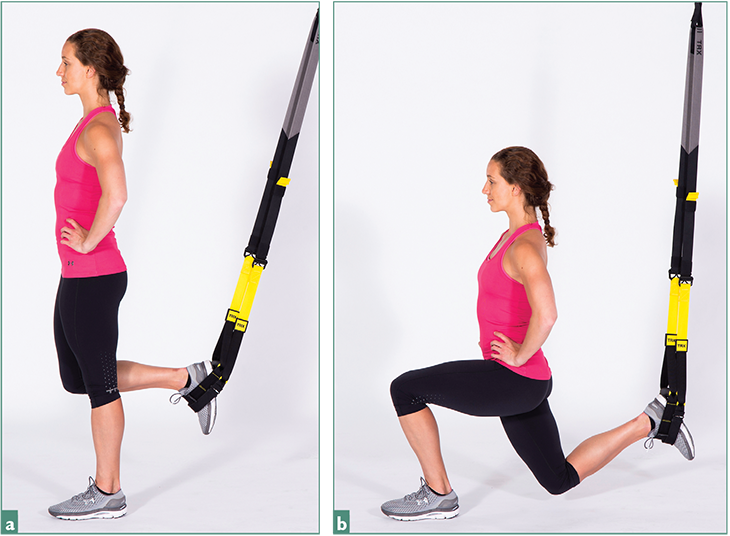
Adjust the straps to mid-calf length. Stand facing away from the anchor point with the hands on the hips, and place one foot in the foot cradles (see figure a). The other foot should be firmly planted on the ground with weight evenly distributed between the big toe, little toe, and heel. While maintaining a rigid torso, allow the lead leg, ankle, knee, and hip to flex until the top of the thigh is parallel to the ground (see figure b). Extend the lead leg and bring the back foot forward until returning to the starting position. This test is measured by counting the number of repetitions performed within a set period of time (e.g., one or two minutes), or by counting the number of repetitions performed with good technique or until volitional fatigue. During the test, one may rest in the starting position. If the individual is unable to maintain balance, the test should be terminated and the number of repetitions to this point should be recorded. When completed, place the opposite foot in the foot cradles and then repeat using the opposite leg.

HOW TO USE THE RESULTS
The information gathered from testing can be used in several ways. This section explains how to use this information to determine the efficacy of the training program and how to adjust it to continue making progress.
Tracking Progress
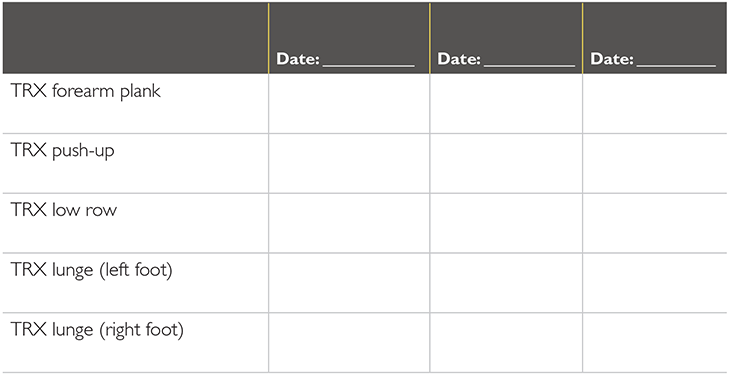
Figure 4.1 is a blank Suspension Training assessment tracking sheet for measuring fitness progress.

From J. Dawes, Complete Guide to TRX® Suspension Training®, 2nd ed. (Champaign, IL: Human Kinetics, 2023).
Measuring Change
One way to gauge fitness progress is to simply look at the amount, or percentage, of change between testing dates. To calculate the amount of change, subtract the value of the previous test from the value of the current test. Look at the completed tracking sheet in figure 4.2. If the athlete was able to perform 20 push-ups during the first test, and 12 weeks later was able to perform 30 push-ups, this would be a net change of 10 push-ups. The percentage of change could also be calculated as follows:
-
Subtract the old value from the new value:
30 push-ups (current test) – 20 push-ups (previous test) = 10 push-ups -
Divide the amount of change by the old value:
10 push-ups (amount of change) / 20 push-ups (previous test) = 0.50 -
Convert to a percentage by multiplying the decimal number by 100:
0.50 × 100 = 50 percent increase
SHOP

Get the latest insights with regular newsletters, plus periodic product information and special insider offers.
JOIN NOW


