Examination of Sense: Vision, Smell, and Hearing
This is an excerpt from Examination of Musculoskeletal Injuries 4th Edition With Web Resource by Sandra Shultz,Peggy Houglum & David Perrin.
Examination of Vision, Smell, and Hearing
Unique to this region of the body is the examination of the sensory organs for sight, smell, and hearing. This includes a close inspection of eye and ear structures using an ophthalmoscope and otoscope, respectively, and testing for visual, smell, and hearing acuity.
Interior Eye Examination Using an Ophthalmoscope
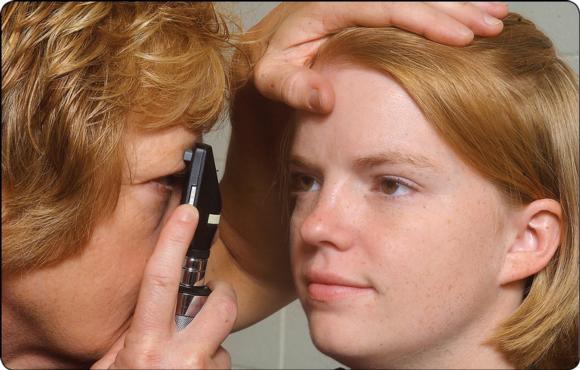
An ophthalmoscope(figure 19.8) is an instrument used in a routine eye exam to detect injury or disease in the interior structures of the eye. It consists of a light source combined with a set of lenses of graded focal lengths designed to inspect the structures of the eyeball. The lenses are calibrated so that shorter (black scale, positive values from 0 to +16) and longer focal lengths (red scale, negative values) can be used to isolate the structures by moving them in and out of focus. With experience, you will become familiar with the scale settings and which focal length best visualizes each structure. In general, shorter focal lengths focus on structures in the anterior globe (e.g., lens and cornea), whereas longer focal lengths examine the internal structures (e.g., retina and optic nerve). There are two types of ophthalmoscopes, direct and indirect. In the clinical setting, you will more commonly use the direct ophthalmoscope, a handheld instrument with a battery-powered light source.

Eye examination using an ophthalmoscope.
Visit the web resource, video 19.1, for a demonstration of using an ophthalmoscope.
To examine the internal structures of the eye, hold the instrument in one hand, keeping the index finger free to manipulate the focal length, beginning with the lens setting at zero. To examine the right eye, sit on the right side of the patient and use one hand to stabilize the forehead and the other to hold the instrument. The room should be dimly lit during the examination, and the ophthalmoscope should be approximately 3 in. (7.6 cm) from the eye surface. Resting your hand on the patient's cheek may help you maintain a steady hand and the correct distance from the eye surface. With the patient holding her gaze at a stationary point on the far wall, view the retina through the pupil using your right eye. A minor adjustment in the focal length should bring the retina into focus. A nearsighted patient requires a more negative setting to focus deeper into the elongated globe; the opposite is true for a farsighted patient (Munger and Baird 1980). The optic disc, retina, and blood vessels should all appear normal. Understanding the appearance of normal is best accomplished through practice with a trained professional.
To examine structures in the anterior globe, increase the setting to approximately +6 to bring the lens into focus, and progressively increase magnification to +15 to view structures through the anterior chamber, including the cornea (Munger and Baird 1980). Note any inconsistencies or evidence of debris. As with the internal structures, practice with a trained professional will develop your examination skills.
Inner Ear Examination Using an Otoscope
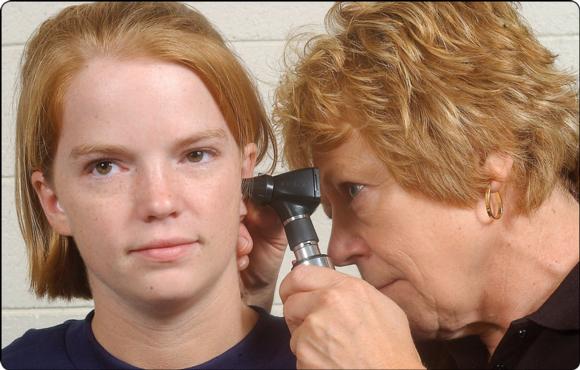
An otoscope(figure 19.9) is a light source combined with a magnifying lens and specula used to examine the inner ear. The specula are usually disposable for hygienic purposes and adjustable in size to accommodate adults and children. The examiner holds the otoscope with the hand corresponding with the ear to be examined.

Ear examination using an otoscope.
Visit the web resource, video 19.2, for a demonstration of using an otoscope.
First inspect the outer ear for swelling and other abnormalities. Use your free hand to grasp the outer aspect of the ear, gently pulling it upward, backward, and outward to allow you to view the canal and eardrum. Be careful to introduce the speculum gently into the canal to avoid friction or pressure because the canal is very sensitive and rough insertion may cause pain or a gag or cough reflex. Note the condition of the skin, evidence of foreign bodies, redness, or swelling in the canal. If the canal is clear, you can observe the tympanic membrane (eardrum) as a pale or grayish structure deep in the canal that is pulled inward at its center by the malleus. Inspect the membrane for evidence of scarring, which appears as a white, thickened area, or signs of erythema, a pattern of small blood vessels that indicates inflammation (Munger and Baird 1980).
As with use of the ophthalmoscope, considerable practice is required to distinguish normal from abnormal findings. Refer patients if you note swelling, redness or disruption of the external canal and eardrum, excessive wax occluding the canal, or excessive swelling trapped in the external ear (pinna).
Visual Acuity Testing
A Snellen eye chart, named after Dutch ophthalmologist Herman Snellen, is relatively inexpensive and simple to use. It displays 11 lines of letters in decreasing size from top to bottom (figure 19.10). Modified charts may use numbers or a tumbling E chart for which patients must identify the direction that the E faces (up, down, right, or left). To test visual acuity, position the patient 20 ft (6 m) in front of the Snellen eye chart. Test each eye individually by covering the other, and also test both eyes together. Each line represents an acuity fraction typically ranging from 20/20 to 20/200, and the patient is scored based on the lowest line he can clearly read from 20 ft away. Normal vision is considered 20/20. A visual acuity of 20/50 indicates that the patient can read from 20 ft what a person with normal acuity (20/20 vision) can read from 50 ft. Immediately refer any patient showing a loss of visual acuity or blurred or double vision to an ophthalmologist for further examination.

Snellen eye chart.
If a Snellen chart is not available, you can grossly examine visual acuity by having the patient read the scoreboard for distance vision. You can test near vision acuity by having the patient identify the number of fingers you hold in front of her or by reading text on a page.
Smell and Breathing Testing
Loss of smell or difficulty breathing can occur with epistaxis and nasal fractures, but smell and breathing should return to normal once bleeding and swelling subside. Loss of smell can also result from injury to the first cranial nerve (olfactory) and may be evidence of brain trauma. To determine the presence of smell, have the patient close both eyes and describe or identify a particular scent that you wave under the nose. The scent should be one that the patient is familiar with and able to identify under normal circumstances.
Hearing Acuity Testing
Transient hearing loss is common with blows to the head or ear, but hearing should return to normal shortly following injury. Sustained hearing loss may indicate a rupture of the tympanic membrane, infection, swelling, or impacted cerumen. You can examine diminished or loss of hearing bilaterally by rubbing two fingers together or by snapping your fingers beside the patient's ear. Patients with lost or diminished hearing in one ear may turn their head while you speak to align the good ear with the direction of the sound. Whenever loss of hearing persists or is profound, you should refer the patient to a physician for further examination.
More Excerpts From Examination of Musculoskeletal Injuries 4th Edition With Web ResourceSHOP

Get the latest insights with regular newsletters, plus periodic product information and special insider offers.
JOIN NOW
Latest Posts
- Assessment of the Atlanto-Axial Joint (AAJ)
- Side-bending Muscle Energy Technique (MET) for the cervical spine
- Ligaments of the vertebral column in the cervical spine
- What are exercise snacks?
- Create positive muscle-strengthening experiences for those with excess weight
- Empower health behavior change through effective communication and motivational interviewing


