Establish Perfect archery Form
This is an excerpt from Archery-5th Edition by Kathleen Haywood,Catherine Lewis.
Mimicking a T-Form Shot
The best way to learn the basic T-form shot is to first mimic it without actually shooting an arrow. Mimicking gives you the chance to make the motions of shooting habitual and gradually get used to the equipment. Mimicking contributes to safe shooting, too. You can make sure you are handling the bow and arrow safely and are not overdrawing the arrow.
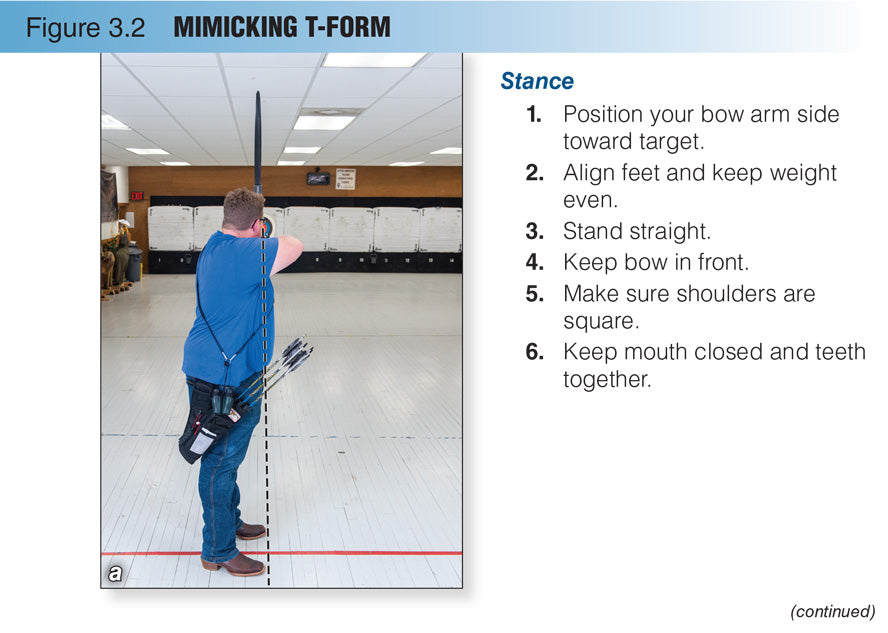
Take a stance with your bow arm side toward the target, feet shoulder-width apart, and weight even. Check your stance by imagining a straight line going through the toes of each foot. If this line would continue toward your target, you are in good position (figure 3.2a). If it would not, adjust your position. Stand straight and keep your shoulders square over your feet and your head square on your shoulders. Avoid twisting your trunk.
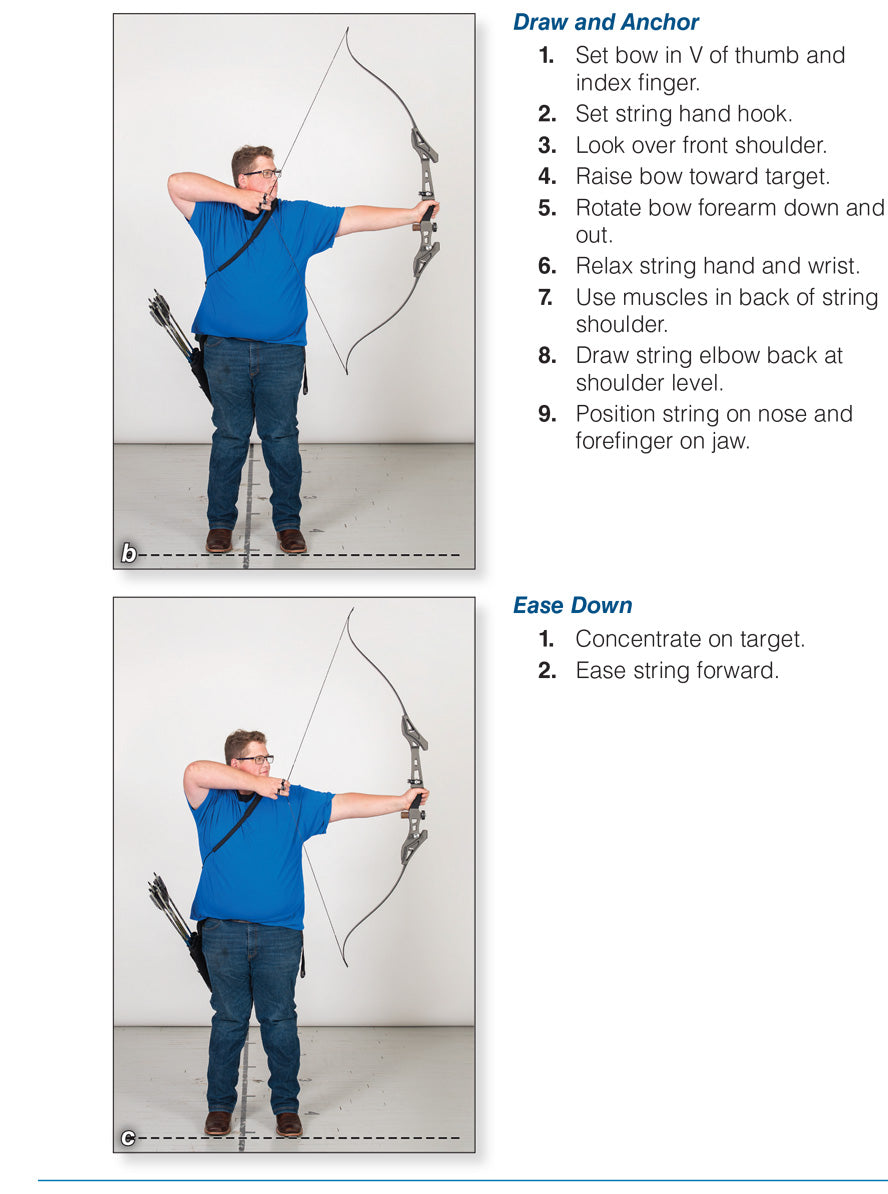
Hold the bow at the handle straight up and down in front of you. Form a hook with the middle three fingers of your string hand. Hook the bowstring in the end joint of the fingers with one finger above the nocking point and two below it (figure 3.2b).
Raise and extend your bow arm at shoulder level toward the target, keeping your string hand in place on the bowstring. Look over your front shoulder. Draw the string by pulling your elbow back in one fluid motion. The shoulder blade of the drawing arm should move toward your spine. Remember, you will need to exert enough muscular force to overcome the draw weight of the bow. Continue drawing to your anchor position. The anchor position is the place at which the string touches the tip of your nose and your top finger touches under the side of your chin. This is the safest anchor position for a beginning archer. Rotate your bow elbow down and out. Hold this position for a few seconds, noticing how it feels, and then slowly ease the string forward to the bow’s relaxed position (figure 3.2c). Never release a bowstring unless there is an arrow in the bow because dry-firing might damage the bow. Relax before repeating the process.


Misstep
The bow arm’s elbow turns in toward the anticipated path of the bowstring.
Correction
Make sure your bow hand is directly behind the bow handle, and then rotate your forearm down and out.
Misstep
The string arm’s elbow bends, and then the back muscles are used to draw the bowstring.
Correction
Think first of using the back muscles and then moving the elbow back to draw the bowstring.
Using the muscles of the back is important for good shooting. Starting the draw by rotating your string-side shoulder blade and moving your elbow back ensures good back tension. With back tension, you will be able to develop consistent form and resist tiring. Drawing with the back muscles places the two arms in a straight line pointing to the bull’s-eye. In step 6, we discuss how back tension also makes for a smoother release.
You might be tempted to skip mimicking, but remember that learning T-form before you start worrying about where the arrow will go will reap benefits later. When an archer shoots with a draw position based on straight lines and right angles, accuracy is sure to follow. Some world-class archers mimic their shots as a warm-up before their shooting sessions, so don’t be afraid to make mimicking a regular part of your archery practice.
More Excerpts From Archery-5th EditionSHOP

Get the latest insights with regular newsletters, plus periodic product information and special insider offers.
JOIN NOW
Latest Posts
- How do I integrate nutrition education into PE?
- How does the support of friends and family influence physical activity?
- What makes the Physical Best approach unique?
- Strength training gimmicks . . . or not?
- How do vitamins and minerals support our bodies?
- Why do many people have difficulty losing weight?


